
as i mentioned - i recently took a bookbinding class at a local gallery. i had so much fun and learned a lot! i was totally amazed that a person can make something so professional looking with their hands. i find myself looking at the bindings of books all the time now. i've even started creating a couple at home! i'm going to try and write this while keeping in mind that you may not have the exact tools needed. there's lots of different techniques for putting a book together but today i'm going to teach you the one that i learned.


supplies list:
(i've started the really necessary materials. i didn't include amounts because you can really only buy these things in some variation of bulk - enough to make a few books)
paper* | i find computer/cartridge paper is fine. the thicker the paper the harder it may be and the more homemade it will look.
sharp pencil | or pen
ruler | steel is best, anything works fine
scissors | kitchen or craft scissors with sharp edges are best
bone folder | used for folding and pressing and flattening. worse comes to worse the back of a butter knife might suffice!
needle* | thinner needle for a smaller book/smaller signature/smaller string, thicker for larger book/signatures/string. needle length doesn't really matter.
awl | you could also just use the needle to poke or pre-poke holes but that might hurt your finger after awhile. mine is cheap and looks like this.
string* | see images below. not too thick, but strong. thread does not work. dental floss does!
binding tape | cotton twill or cotton ribbon will work as well
glue* | pva glue is recommended. school glue seems to work - not sure about long term though!
matboard | you could just work on top of cardboard but if you don't have a ruler you'll want a mat cutting board with measurements.
mull cloth | cloth mesh. i'm going to say gauze would work very similarly.
book board | or news board, or thick chip board, or cardboard or foamcore.
book cloth | special cloth with paper adhered backing so that the glue doesn't stain through the cloth.
twine | thick two inch strip
*read the following instructions to determine which tools and supplies you need. note that this project can be completed in under four hours with dedication. but there's also lots of points where you can take breaks for as much time as you like. all of these materials together may cost over 150 dollars. but you can likely make multiple books with them. if you just want to try it out, take a class somewhere, see if you can borrow some of the supplies or take note of my "alternative" cheaper options above. if you want to spend less - use cardstock as your cover and avoid spending money on book board and mull cloth and book tape and book cloth!
steps for creating a book:
decide on your book size! to make it simple, try creating a 8.5 x 5.5 book because that will be the easiest. collect twenty-five to thirty sheets of 8.5 x 11 inch paper. fold them all perfectly in half. press the fold tight using a bone folder or your finger. each time you fold five sheets ("folios"), tuck them inside each other as seen in the image below (creating a "signature").

using one signature, measure in one inch from both the left and right sides. make a little pencil mark. measure to find the exact middle between those two points. make a little pencil mark. you now have three marks. measure between the left two marks and the right two marks to find the exact centres again. you should now have five marks. place a two inch strip of binding tape over the most middle mark and draw little lines just outside the tape. then erase the centre mark. repeat this same set of actions action for the last two marks you made but not the outside marks. then stand all of your folios together and use a ruler to copy the marks to each signature by dragging your pencil upwards against the ruler and the paper. when finished, your signatures should be marked like the ones below:

measure your thread by stretching it across the length of your "spine" five to six times (five times for five signatures, six times for six signatures etc...). and include a little bit extra as well for some give and a tail. thread your needle. pull through three inches of thread but no need to tie a knot anywhere.
use your awl or the needle to poke little holes over the spine on the pencil marks (you can poke them all at the beginning or do each set separately). this will make pushing the needle in easier! check the inside to ensure you are poking straight through to the inner fold/spine - sometimes the pages move slightly.
starting outside the spine, push your needle into the first hole (it doesn't really matter but i start on the left side - you should too in order to follow along!) pull the thread all the way through leaving a three inch tail sticking out. push the needle back up through the next hole and then down and then up etc etc. tuck the tape pieces underneath the centre three stitches as seen below:

when you get to the end of your first signature, poke your needle into the right side of the next signature (outside in). repeat the steps above except tuck your needle underneath each binding tape stitch as seen below. careful not to thread it through the material of the tape. when you get to the end/left side, tie a double knot with your tail. keep the needle on the thread.

repeat these steps for the next set of signatures. but each time you come to the binding tape tuck your needle only under the most recent stitch. from now on when you get to the end of a signature you are going to create a "kettle stitch." it sounds fun and fancy but is essentially just knotting your string to the previous signature. take a look at this. loop your needle under link in between the previous two signatures and then back through the loop you just created. pull tight.

all of your signatures stitched together should look like this (isn't it pretty?):

in this instance i used a wood board, a table and a giant clamp to squeeze my book together for gluing. but i've found that a table and a couple of heavy books also do the trick! use a little paintbrush or your finger to apply glue to the entire spine. nestle it between the signatures, and over the binding tape too. there shouldn't be any shadows when you are done. do two layers for good measure and glue your tail down as well. let sit for fifteen minutes.

choose your end leaves and measure them to 8.5 x 11 inches. fold them in half just like you did with the other paper.

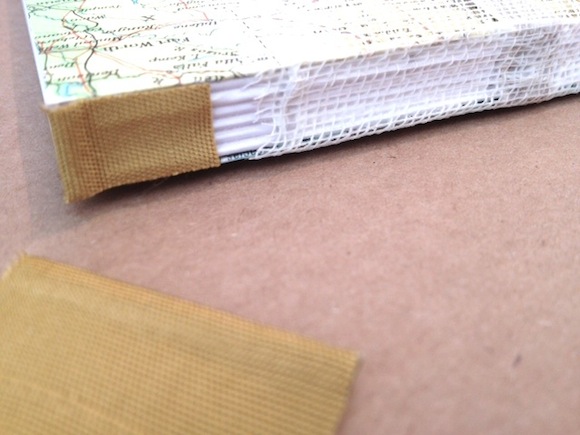
paint a little bit of glue under one side of your end leaves near the spine (about 3/8 inch all along the spine). tuck it under the binding tape and press to adhere the glue to the pages below. take a strip of mull cloth or gauze (about 5x5 inches) and fold it over the spine as seen in the photo below.

adhere the cloth to the spine: paint over just the spine area with glue using a paintbrush or your finger (you're washing your paintbrush in between right? cause it's glue, not paint, which means it will harden quick!). see the photo following this one for information on creating your "headband."

no, not a headband for your hair (i think this project is more than enough for one day!). this headband is not entirely necessary but makes the finished product look much more professional. see the finished headband in the fifth to last photo of this post.
cut a little strip of book cloth (2x2 inches). use a large piece of twine or something (hopefully you have this lying around the house). lay it on the middle of your book cloth strip. apply glue on one half of the cloth strip. then fold it over and glue both sides together. rub the string tightly into the fold - use your nail to define it.
trace around your in-progress book using a pencil onto the book board. write a little "s" next to the side which will be the spine. on the remaining three sides, measure outwards an additional 1/4 inch and create new lines. so the book board that you cut out should be lined up exactly with the spine as seen below, but just a little bigger on all the other sides (see finished book for reference).
then cut the spine. i originally had a little trouble understanding this part but it makes sense in the end: the final width of your spine board should equal to the width of your book spine plus the width of the two covers you cut minus one half of one.
aww forget it - i'm just going to draw an arrow below to show you how wide you should cut it the strip for the spine board (the length should obviously be equal to the length of the covers you cut).

lay your three pieces of book board (two covers plus spine board) down on your book cloth. make sure they are as level as possible. use a ruler to make sure all the tops and bottoms line up together. there should be 1/4 inch of space between the spine and each of the covers. trace around them. then measure an additional 1 inch of cloth around the board covers as seen below. cut your traced cloth out on the outside lines.

apply glue to the inside lines that you traced where the spine board and cover will be placed. use a large paintbrush, or even better - a foam brush or roller brush to apply the glue evenly to larger areas. place your spine down onto the glue covered section in the centre. do the same with your cover boards. use your bone folder to press across the board/material and get rid of any air bubbles.
cut off all four corners of book cloth on an angle (see image above). don't cut it exactly on the corner, but just a little bit above it it. this will make folding the excess material inwards possible. paint each section of excess material with glue and fold it inward onto the book board covers. use your bone folder edge to fold all the tiny corners down for a really precise and professional look.
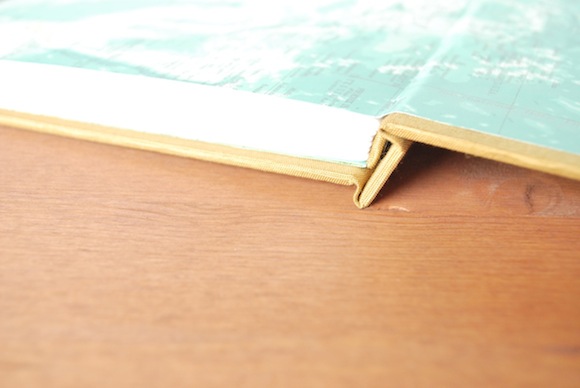
paint some glue on the empty book cloth spaces in between the spine board and the two cover boards. pick up your in progress book and stand it up vertically on the spine. line it up really nice on the spine board (this is it!). fold both of your covers upward. then use your bone folder to push inward on the sections you just adhered glue to (see image below). rub the niche/hinge back and forth for awhile on both sides. press the entire book under some other heavy books or clamp to a table for fifteen minutes.

open one side of your book and glue the mull cloth (plus binding tape underneath) with your paintbrush to the cover board. then use a foam roller again to apply glue evenly all over the end paper (the side that is closest to the cover board). close the cover and push it down on the end paper to stick it to the glue. open it again and use your bone folder to get rid of any air bubbles and create a smooth finish. repeat this step with the end paper on the other side of your book.

and voila! you are done!


Wow! Looks really good :)
ReplyDeleteabsolutely brilliant! i would love to try it out- thanks for sharing the tutorial xo
ReplyDeleteThe Young Bridget Jones
Aw that looks great, I'd love to give it a try :) xx
ReplyDeleteThis is awesome, Kaitlyn!
ReplyDeleteBest tutorial I've seen in a long time! I really must try this, it looks so professional!! ♥
ReplyDeletethanks ladies!! you should all definitely try it, it's addictive!
ReplyDeleteWow, it's absolutely lovely Kaitlyn- I would love to give this a try one day! :)
ReplyDelete